Tag: Bread

  • Happy New Year! Foodie Resolutions

    This post was written as GoodEggFoodie.com. Please excuse any wonky formatting. Visit the homepage SHE-EATS.com for the latest, shiny new content.

    It’s here: 2014. Exciting year for me- later this month I am going back to uni to do a post grad, so it’s going to be full on until summer.

    I don’t really do resolutions; I always think they’re just something to make me feel bad about myself when I don’t fulfil them. But there are a few food-related things which I want to try and get my head round this year, but in a no-pressure, doesn’t matter if I don’t kinda way.

    Better Blogging

    The look of my blog has been a bit all over the place, but now it’s new year, new start. I’ve updated my theme and will start to standardise the way I use images. So GoodEggFoodie will look all shiny and new from now on in!

    I am going to be super-busy with school but will try and blog regularly as well.

    Photography

    Linked to the better blogger wish, I am going to make more of an effort with my photos. I still hate taking pics in restaurants and will probably continue to do so on an ad-hoc iPhone basis, but am investing in a new camera this weekend so I am determined to make more effort with my recipe pics. I know a good camera doesn’t mean good pics, but I want to take it seriously.

    Chopsticks

    Chopsticks

    Thirty-five and can’t use chopsticks. I am really cack-handed but I want to crack chopsticks. I am going to buy some of those kiddy ones which are connected at the bottom in the mean time!

    Bread

    Bread

    My continued nemesis, I will not be beaten! My lovely folks bought me a day-course in bread making for Christmas which I am going on in March. Hopefully some expert advice and practice and we can say good bye to homemade bricks!

    So they’re my foodie resolutions, any tips on getting through them? And what are yours?

    Happy new year!

  • Cracking Bread: Day Three- Sourdough

    This post was written as GoodEggFoodie.com. Please excuse any wonky formatting. Visit the homepage SHE-EATS.com for the latest, shiny new content.

    Three methods, one week. It’s now or never…

    Check out the introduction to the project here.

    Day 1- fresh yeast bread is here.

    Day 2- dried yeast is here.

    So I got here – to the day I knew was going to be my biggest challenge. So far, both the breads I have made have been edible and in the River Cottage book I seem to have found a method of working the dough which works for me.

    I was given a sourdough starter by a friend a year ago. He also gave me the recipe and method which he uses; that from the original Moro cookbook. I’ve heard people talk about the bread at Moro in reverential tones, so I was happy to start my sourdough journey with this.

    I have been looking after the starter for a year – it lives in the fridge (I was assured this was ok) and is fed every so often- more when I am using it. I have tried sourdough in the past but it hasn’t yet been edible. So when this bread began the starter was in pretty good shape and looked quite lively.

    Here’s What Actually Happened…

    This bread took 24 hours from start to finish.

    Thursday night I mixed flour, starter and water before bed. I left it in a warm, draft-free place; otherwise known as the utility room. When I got up on Friday the mixture was quite frisky and had bubbled.

    I then added flour and salt and mixed. The method suggests that you do this in a mixer as it is so wet. I left it to stand for ten minutes then mixed again for a couple of minutes. I then poured into two tins and left to rise. And that is when the fun began! The method says it would take 3-5 hours to rise about 1/3. I check in on it after three hours: no change. Four hours: no change. Five hours: a slight rise but only by a millimetres. I text Darren who gave me the starter to seek advice. He assures me a slow rise = a tastier loaf so I resist the urge to bin it. Six hours: I am cooking in the kitchen so decide to move it next to the oven. We have lift off.

    Nine and a half hours later and it is finally ready for the oven. They went in for thirty minutes at 230c, I then took them out of the tins and cooked for another fifteen minutes.

    The Results

    Well they took so long that they only came out of the oven at bed time, so the bread was started on Thursday and finally tasted on Saturday!

    Sourdough tin

    Both loaves looked the same- thick crust and well coloured. The taste is alright. It is nowhere near as tasty as sourdough which I have bought from the likes of More Artisan and it isn’t even as tasty as the other breads which I have made this week. Inside, it has an even look which I would normally be pleased with but I know that sourdough should be uneven inside with large bubbles which just hasn’t occurred here.

    I am disappointed but not surprised. I knew when my loaves weren’t rising that my starter mustn’t have been active enough.

    Sourdough bubbles

    We’re having friends round tonight and I was planning on serving this with a terrine as a starter. I am now unsure if I should inflict it on them or not?

    Done well, sourdough is such good bread, so I will persevere, give my starter more love and try different recipes (Dan Lepard’s name comes up again and again).

    Bread, Cracked?

    I have really enjoyed this week, and it has done my bread-making confidence the world of good to tackle this kitchen demon head on. I’ve also come across some great bread makers on Twitter doing this who are trying to crack bread like me, or who are confident in their skills and happy to share.

    I found the Richard Bertinet method of working the dough difficult and messy, but the final bread tasted great. The River Cottage method seemed to come together much better than the Bertinet one, and again the results were good. Both these books have some really good, tasty looking bread recipes in them, so I plan to try many more, using (and improve upon my early attempts) the River Cottage method. In fact I am already looking at rye recipes for next week.

    In terms of sourdough, again it is something which I will keep working at. As I said above, I will try and get my starter up to scratch and try different recipes. But if this week is anything to go by, I think that yeast is the way to go for me.

    Whilst I am not working, this is the perfect opportunity for me to spend time perfecting my loaves and at the same time hopefully saving us some money by making it myself. I won’t shy away from bread making any more, but seven loaves in one week is not good for the waistline so I will be leaving it a few days before I get the flour out again!

  • Cracking Bread: Day Two- Dried Yeast

    This post was written as GoodEggFoodie.com. Please excuse any wonky formatting. Visit the homepage SHE-EATS.com for the latest, shiny new content.

    Three methods, one week. It’s now or never…

    Check out the introduction to the project here.

    Day 1- fresh yeast bread is here.

    Today’s recipe and method comes courtesy of the River Cottage Bread Handbook by Daniel Stevens. The book goes in to quite a lot of detail about the bread making process- about thirty pages to be exact. Again, when I first got it this was something which I skimmed over so I have now gone back and read it properly.

    It isn’t too different from the Bertinet method from day one of the project, requiring you to stretch rather than knead the dough. The recipe was good in that it works in percentages so once you get the hang if you can play around knowing that it should always work if you stick to the correct ratios. Again not too different from the Bertinet recipe but it gives the basic recipe using 1kg flour and uses dry yeast. It also suggests that you can add a ladle full of starter if you have any (I do, so I did) and also a bit of fat.

    I was interested to see how much kneading would be required with this method. On day one, I worked the dough for up to half an hour so I was looking for something a little easier on the arms (although, great news for bingo wings!).


    Here’s What Actually Happened…

    The Rivercottage Basic Bread Recipe

    1kg flour (I used 70% white, 30% white seeded for a bit of variety)

    10g dried yeast

    20g fine salt

    600ml water

    Ladle of sourdough starter

    Tablespoon of olive oil

    Dough rising

    The method was noticeably easier than on day one- basically stretch and turn, stretch and turn. Repeat. It took me about twenty minutes but I could feel the dough changing in my hands and although I stopped several times to clean my hands, the dough didn’t stick to the worktop anywhere near like it did on day on.

    The first rise took about 90 minutes to double, then I reshaped it and gave it a second rise. This took about an hour to double in size. The book suggests that you can do this three or four times if you wish, but there aren’t enough hours in the day for me.

    After the second rise I shaped the dough into two balls and left the prove for 50 minutes whilst the oven heated. As you can see from the pictures, loaf one isn’t exactly shapely! When I took it off the mat and onto the hot tray it flopped in my hands L So when I put loaf two in I left it on the silicon mat and put the whole lot onto the hot tray and that solved the problem. Oh, I also went and got me a water bottle and sprayed the bread and the oven before the bread went in. Steam = better crust.

    I had to cook them separately but did them both for 10 minutes at 250c and 35 minutes at 170c – these were fan oven temperatures. Both came out well browned and passing the ‘tap test’.

    The Results

    Two loavesLoaf one was wibbly – I need to work on my shaping! As with day one, it was also still a bit claggy inside. It is cooked but still a bit damp. The problem is that the crust is dark and it sounds hollow- so I need to have the courage of my convictions and turn it down for an extra few minutes on low.

    Loaf two looks great. Round, the cuts have opened out and it is cooked through.

    Both are tasty – adding a bit of starter gives some depth to what could otherwise be dull white bread. I am alarmed by how much salt these recipes all seem to call for – is it is necessary for the yeast to work? Saying that, it doesn’t taste salty, and we have little salt in our diets anyway, so I am not going to agonise over it too much!

    I found the River Cottage method much easier, but there isn’t much in them in terms of taste. I am doing white bread on all three days as I think it is a good starting point, but I am already planning the River Cottage sour rye next week!

    cut loaf

    Up Next: Day 3 – Sourdough

    The third and final day of bread week will be Friday 13th (eek) and a sourdough recipe and method from Moro. Actually I will be starting it Thursday night as it is quite a long and slow process. Fingers crossed, the results will be worth it.

    Until then, it is an all you can eat bread buffet in our house- I am doing to absolute opposite of almost everyone in January and overloading on doughy delights!


  • Cracking Bread: Day 1- Fresh Yeast Bread

    This post was written as GoodEggFoodie.com. Please excuse any wonky formatting. Visit the homepage SHE-EATS.com for the latest, shiny new content.

    Three methods, one week. It’s now or never…

    Check out the introduction to the project here.

    So it is day one of baking and first bread I am trying is with fresh yeast.

    I got the book Dough by Richard Bertinet a couple of years ago and although the recipes all specified fresh yeast, I could never get any so substituted dry yeast instead. There was also a DVD which explained the baker’s unique method of working the dough, but I just looked at the pictures in the book instead. It never seemed to work out! So now things are different. I can get fresh yeast easily from the new Morrisons supermarket which is 2 minutes away. I have bought digital scales so I can weigh 10g of fresh yeast instead of weighing out 20g on my old ones and roughly halving it (oh yes, I really did that). I will weigh my water as he suggests (and I have in the past scoffed at). And most importantly of all, I have watched the DVD and taken some notes. You can watch him work the dough here on the Guardian website.

    So what is this magic method? Basically you have to get your hands under the dough, slap it back on the worktop and then stretch and lift. It is much easier to understand after you have watched him do it rather than trying to follow the pictures in the book. Oh, and there is minimal flour on the worktop. The idea is that you get a soft, pliable dough not hardened by additional flour and with lots of air going on inside.

    That’s the theory anyway.

    Here’s What Actually Happened…

    The Bertinet Basic White Bread Recipe

    • 10g fresh yeast
    • 500g strong white flour
    • 10g salt
    • 350g water at room temperature

    In the end I made up three batches of dough – this was not my original plan but I panicked a bit after the first batch.

    Batch 1

    I make up the dough and start working it on the top (which is granite so quite cold). And more, and more…After 30 minutes it is still sticky although it does have some bounce. I have an appointment to go to so I decide to rest it and see what happens. Well nothing much does happen. After an hour it has risen, but only slightly. It takes two hours for it to double in size.
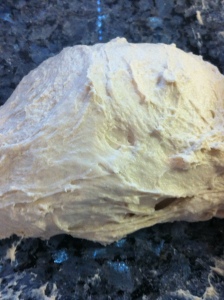
    Dough

    Batch 2

    Over lunch I re-watch the DVD to make sure I am doing it correctly (I am), then decide to give it another go. Again, I work the dough in Bertinet’s way for about 25 minutes. It is coming away from the worktop easier but is still sticking to my hands. Why isn’t it going smooth? The desire to throw flour over everything is strong but I resist. I give it another few minutes, then roll it and leave it to rest. Again, it takes a couple of hours to double in size.

    Whilst it is resting, I do question why I am doing this method with my hands when it obviously isn’t working for me and I have a perfectly good Kitchen Aid with a dough hook. I think that I have it in my head that to use the mixer is cheating somehow and it won’t be made by me. But you know what, if it tastes good, why am I worried? So I decide to put all my self-imposed bread snobbery to one side and do one more batch.

    Batch 3

    Last batch today, I have a life and the kitchen is starting to resemble a flour explosion. Monsieur Bertinet says that if you use a mixer then 6-7 minutes on speed number two. So there you go, he tells you how to do it in the mixer so it must be ok. I mix and shape it and leave it to rise. It doesn’t rise. At all. Bugger. Binned.

    The Results

    Batch one I make in to baguettes following the method in the book. I only get three out of my batch and cook them for 12 minutes. They come out golden brown. They taste good too- chewy like proper baguettes. I am pleasantly surprised as this is the batch which I had no faith in and lead me to making up the two others!
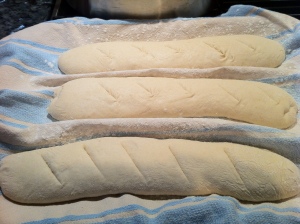

    Shaped baguettes Finished baguettes

    Batch two I shape into a round and make one big loaf which I cook for about 30 minutes until it sounds hollow when I tap it. As you can see from the first picture, I mustn’t have shaped it properly as the ball split as it rose and left me with a loaf shaped like a Muppet’s mouth. Also you can see in the second image, there was lots of air in the top, but it was dense in the bottom. It was still a bit claggy inside so needed longer in the oven- but it was very dark on top and the traditional tap test did suggest that it was done. I’m not sure how else I can test that bread is done? Putting aside that it was slightly undercook, again the taste was good.
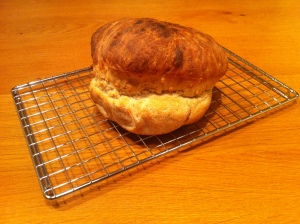
    Muppet mouth bread

    So in the end, the method worked well for the baguettes and the flavour was good. However, It felt alien, slapping the dough around like that, and I never got it silky and smooth like the author said should happen. In the book it says you can knead using this method in 5 minutes when you get the hang of it. I just can’t see how that would be. So for me it is a case of good flavour but not a technique which I am comfortable with.

    Up Next: Day 2- Dry Yeast

    Cracking Bread day 2 will take place on Wednesday 11th (we need a day to eat the baguettes before cooking any more!). I will be making a loaf using recipe and method from the River Cottage Bread Handbook. Day 3 will be Friday 13th and sourdough from Moro.

    If you have any tips or your own experiences of real bread, I would love to hear them.

    Until Wednesday, happy baking to you all!

  • The Cracking Bread Project

    This post was written as GoodEggFoodie.com. Please excuse any wonky formatting. Visit the homepage SHE-EATS.com for the latest, shiny new content.

    Three methods, one week. It’s now or never…

    I consider myself to be quite a competent cook in general and baker of cakes in particular. But bread is my Achilles heel. I can knock up a decent pizza dough, flat breads or batch of pitta bread, but when it comes to an actual loaf which will see us through a few days I have always struggled.

    And I love bread. Thick toast with salty butter, soldiers with eggs, salad sarnies…so it is a shame that I can’t enjoy the fruits of my own labour and fewer additives to boot. There are great artisan bakers in the region, but none nearby and to be honest I am on a budget at the moment so that is quite a treat.

    Well enough. I am determined not to let it beat me, so I have come up with the cracking bread project. I am going to make bread three times this week, using three different methods and by the end of it I will either have found a style which works for me, or I shall forever be forced to buy pre sliced from the supermarket.

    I will blog my progress each day, and by the end with either have a freezer full of bread crumbs or a new found talent for bread making. I am hoping it’s the latter but I will be completely honest and not hide any failure.

    So here are the methods I am going to follow:

    Fresh yeast bread – following the method of Richard Bertinet from his beautiful (but to date disastrous) book Dough

    Dried yeast bread – following the River Cottage bread handbook by Daniel Stevens

    Sourdough bread – from the Moro cookbook

    I’m not including soda bread because a) I can make that pretty well already and b) it isn’t really a keeper- I am looking for bread that will last me a few days.

    Preparation Is Key?

    Bread prepToday is prep day. I’ve been and got some fresh yeast (until Morrisons opened last month this was impossible to get in Leigh!), I am bringing my sourdough starter back to life with some TLC and daily feedings, I have new and accurate digital scales and am reading up on the methods all three books advise.

    I am also watching the DVD which came with the Bertinet book which explains his method of working dough.

    So that’s it. I want to crack bread. I don’t ask for much in life, so hopefully the gods of yeast and flour will be smiling down on me and help me to make my daily bread somewhat more palatable!

    I will be tweeting links to my progress using #CrackingBread (@GoodEggFoodie), so please check back throughout the week to see how I get on.

  • Comfort & Joy: Soda Bread & Gingery Carrot Soup

    This post was written as GoodEggFoodie.com back when I was on Blogger and lost my images 🙁
    Please excuse any wonky formatting. Visit the homepage SHE-EATS.com for our latest, shiny new content.

    Any regular followers of my Twitter feed will have picked up on the fact that I love a bit of comfort food. I have for a couple of weeks now been blathering on about stews, soups, puddings and risottos. This really is my favourite time of year both outside and in the kitchen.

    So when the nice people at Dove’s Farm sent me a bag of their Organic Heritage Wholegrain Flour, to try out it had to be put to good, comforting use. Yesterday was particularly chilly and with some wobbly veg in the fridge, it was definitely a soup night. In order to fool my hubby into thinking that soup is in fact a meal in itself and not a starter I decided to crack open the flour and make a soda bread to serve warm with it.

    I was initially a bit concerned about using the wholegrain flour for soda bread as wholemeal/grain flours can – in my clunky hands – make very heavy bread. However, as soon as I opened the bag I could see that it was very light in colour and texture. According to the blurb, it is made up of wheat varieties cultivated from an ancient seed bank. So my rather rustic looking final loaf was actually (in my head anyway!) historically correct!

    The cooked loaf had a bit of a biscuity taste to the crust which I really liked and was light in texture. It was still good today when we finished it off with Bavarian smoked ham and chilli jam for lunch. To be honest as I am so bad at bread, I am now kicking myself for not trying soda bread earlier. It will definitely be bread I make more often and I would try this Heritage Wholegrain flour again as well. In fact I still have half a bag left so I am planning an apple cobbler with it at some point- comfort in pudding form!

    Gingery Carrot Soup

    Serves 4 (or 2 with seconds)

    4 x carrots

    2 x red onions

    2 x sticks celery

    1 x small thumb of ginger, peeled

    1x clove garlic peeled

    1L veg stock

    Black pepper


    Thinly slice all of the veg and add to a large pan with a glug of olive oil. Put the lid on and allow to cook for about five minutes in the steam.

    Add a litre of veg stock, a generous grind of pepper, bring to the boil and simmer for about 20 mins.

    Once the veg is soft I let it cool slightly before getting my stick blender in there – hot soup splashes aren’t good. Blend until smooth, adding more stock if you like a thinner consistency, and check for seasoning.

    Serve with warm soda bread


    Doves Farm Soda Bread

    The recipe is on the side of the Heritage Wholegrain Flour bag, so I decided to give it a whirl.

    500g x Organic Heritage Wholegrain Flour (or your bread flour of choice), plus a little extra for dusting

    ½ tsp x salt

    1 tsp x bicarb

    2 tsp x cream of tartar

    450ml milk


    Heat oven to 180c

    Mix the dry ingredients. Add the milk (a little at a time as you might not need it all) until you form a slightly sticky dough

    Form in to a ball, place onto an oiled tray and cook for 30-40 mins

    Delicious warm and well buttered!