Tag: Baking

  • Blood Orange Cake

    With quite a few blood oranges still knocking about in the fruit bowl after I made vodka with a couple, I decided to use some to make a cake. I would have been quite happy to just eat them, but it was noted that I hadn’t taken a cake on my Dad’s birthday a few days ago, so I thought that I had better make amends.

    I have a few recipes in books for lemon drizzle cake so I thought that I would adapt one that I haven’t used before- the lemon and poppyseed cake from the Hummingbird Bakery Cookbook.

    You can find the original recipe here. I used the zest of two oranges in the cake and the juice of two in the syrup (I didn’t bother with the drizzly icing).

    However, you need to note that the link I have given there is to the publishers amendments! I found it when Googling for the recipe to link here and so made the cake from the quantities suggested in the book (I crazily assume that if you are publishing it then it must be right) and it tastes just fine. So I guess if you are trying this then pick an amount!

    Blood orange cakeAs I was making this for someone else, the cake decided to stick in the tin! Literally the first time ever this has happened to me, so I had to cut it out of my bundt in four pieces. Luckily, my parents only took half so we were able to have some here too. It is a really moist cake, and the syrup is nice and tangy. It’s perfect mid-afternoon cake (light, won’t ruin your tea) which is why I am off to have a slice right now!

  • The First Bolton Clandestine Cake Club

    This post was written as GoodEggFoodie.com. Please excuse any wonky formatting. Visit the homepage SHE-EATS.com for the latest, shiny new content.

    Today was the inaugural meeting of the Bolton Clandestine Cake Club, and I was lucky enough to bag a place.

    The aim of Clandestine Cake Club– now a national phenomenon- is to bring bakers (and their non-baking, but cake loving friends) together to eat cake, make friends and have a natter. It is non-competitive meeting so there are no winners and losers- just lots of happy eaters.

    Organised by Rachel McGrath (aka DollyBakes on Twitter), the first Bolton meeting took place at Thyme Deli in Horwich. By the time I arrived in the dining room at the back of the deli, the tables were already groaning with cake, and I had to squeeze my creation in on the end!


    Cake
    Cake…

    I think there were nearly thirty cakes- that is a lot of cake to try…but I like a challenge! Ok, so I didn’t try them all but I had a really good go. Highlights included the lemon curd which came with a ginger sponge, the chocolate orange cake (beautiful and tasty), chocolate Guinness cake (there were two but I only tried one) , a giant chocolate fudge and the crazy carrot cake. In fact, who am I kidding? Every cake was a highlight!

    My own creation was a chocolate hazelnut cake from a Nigel Slater recipe. You can find the recipe online here.

    More cake...
    more cake…that’s mine at the front!

    The best bit of there being so many cakes is that you get to take a load home – so I have enough teeny taster slices to last for a few days!

    The spoils!
    All those cakes, mmm…

    Rachel did a brilliant job organising it (and encouraging me to dust off my rollerblades, but that’s another story) and Amanda and the team at Thyme were so friendly. I think Rachel said she’ll try and do them every six weeks, so if you are in the vicinity of Bolton and love cake, sign up and have some clandestine fun!


  • Celebrate Bramley Apple Week With A Sticky Apple Loaf Cake

    It’s Bramley Apple Week this week so thought it a good opportunity to share a nice apple cake recipe which is perfect for these cold days.

    I made this before Christmas when my lovely neighbour came over with a massive bag of wind fall apples from his tree. I didn’t know that this tree even existed but I am now benefitting from it bearing more fruit than my neighbours know what to do with as I made a couple of these cakes and some spicy apple chutney as Christmas prezzies.

    I ripped the recipe out of my monthly Delicious Magazine a few months back and knew that was one to go to: sticky apple and gingerbread pecan loaf cake.

    Rather than reproduce it, you can find the recipe here. I did make a couple of amendments. Firstly, the apples I have are cooking apples, but this definitely didn’t affect the final result- so it would work wonderfully with Bramleys. Oh I also left the skins on. Lazy but why not? Secondly, stem ginger is rarer than hen’s teeth here in Leigh, so I used 2.5 tsp of ground ginger per loaf instead. Obviously it didn’t have the sticky texture that the stem ginger would have given it, but it was still blinkin’ tasty.

    I made a double quantity so that I could give one back to the neighbours as a thank you. The other went in the freezer which is a brave new world for me. I don’t think I have ever frozen a cake before, but I was trying very hard not to turn into a cake before Christmas!

    Saying that, it came out of the freezer after a couple of weeks and I can report that no cake was harmed during my moment of madness! It is a great everyday cake: the apple feels virtuous while the nuts make it seem a bit more of a treat.

    Oh and sorry about the lack of pictures. I did take some but they seem to have been lost in the post Christmas photo clearout!

  • Cracking Bread: Day Three- Sourdough

    This post was written as GoodEggFoodie.com. Please excuse any wonky formatting. Visit the homepage SHE-EATS.com for the latest, shiny new content.

    Three methods, one week. It’s now or never…

    Check out the introduction to the project here.

    Day 1- fresh yeast bread is here.

    Day 2- dried yeast is here.

    So I got here – to the day I knew was going to be my biggest challenge. So far, both the breads I have made have been edible and in the River Cottage book I seem to have found a method of working the dough which works for me.

    I was given a sourdough starter by a friend a year ago. He also gave me the recipe and method which he uses; that from the original Moro cookbook. I’ve heard people talk about the bread at Moro in reverential tones, so I was happy to start my sourdough journey with this.

    I have been looking after the starter for a year – it lives in the fridge (I was assured this was ok) and is fed every so often- more when I am using it. I have tried sourdough in the past but it hasn’t yet been edible. So when this bread began the starter was in pretty good shape and looked quite lively.

    Here’s What Actually Happened…

    This bread took 24 hours from start to finish.

    Thursday night I mixed flour, starter and water before bed. I left it in a warm, draft-free place; otherwise known as the utility room. When I got up on Friday the mixture was quite frisky and had bubbled.

    I then added flour and salt and mixed. The method suggests that you do this in a mixer as it is so wet. I left it to stand for ten minutes then mixed again for a couple of minutes. I then poured into two tins and left to rise. And that is when the fun began! The method says it would take 3-5 hours to rise about 1/3. I check in on it after three hours: no change. Four hours: no change. Five hours: a slight rise but only by a millimetres. I text Darren who gave me the starter to seek advice. He assures me a slow rise = a tastier loaf so I resist the urge to bin it. Six hours: I am cooking in the kitchen so decide to move it next to the oven. We have lift off.

    Nine and a half hours later and it is finally ready for the oven. They went in for thirty minutes at 230c, I then took them out of the tins and cooked for another fifteen minutes.

    The Results

    Well they took so long that they only came out of the oven at bed time, so the bread was started on Thursday and finally tasted on Saturday!

    Sourdough tin

    Both loaves looked the same- thick crust and well coloured. The taste is alright. It is nowhere near as tasty as sourdough which I have bought from the likes of More Artisan and it isn’t even as tasty as the other breads which I have made this week. Inside, it has an even look which I would normally be pleased with but I know that sourdough should be uneven inside with large bubbles which just hasn’t occurred here.

    I am disappointed but not surprised. I knew when my loaves weren’t rising that my starter mustn’t have been active enough.

    Sourdough bubbles

    We’re having friends round tonight and I was planning on serving this with a terrine as a starter. I am now unsure if I should inflict it on them or not?

    Done well, sourdough is such good bread, so I will persevere, give my starter more love and try different recipes (Dan Lepard’s name comes up again and again).

    Bread, Cracked?

    I have really enjoyed this week, and it has done my bread-making confidence the world of good to tackle this kitchen demon head on. I’ve also come across some great bread makers on Twitter doing this who are trying to crack bread like me, or who are confident in their skills and happy to share.

    I found the Richard Bertinet method of working the dough difficult and messy, but the final bread tasted great. The River Cottage method seemed to come together much better than the Bertinet one, and again the results were good. Both these books have some really good, tasty looking bread recipes in them, so I plan to try many more, using (and improve upon my early attempts) the River Cottage method. In fact I am already looking at rye recipes for next week.

    In terms of sourdough, again it is something which I will keep working at. As I said above, I will try and get my starter up to scratch and try different recipes. But if this week is anything to go by, I think that yeast is the way to go for me.

    Whilst I am not working, this is the perfect opportunity for me to spend time perfecting my loaves and at the same time hopefully saving us some money by making it myself. I won’t shy away from bread making any more, but seven loaves in one week is not good for the waistline so I will be leaving it a few days before I get the flour out again!

  • Cracking Bread: Day Two- Dried Yeast

    This post was written as GoodEggFoodie.com. Please excuse any wonky formatting. Visit the homepage SHE-EATS.com for the latest, shiny new content.

    Three methods, one week. It’s now or never…

    Check out the introduction to the project here.

    Day 1- fresh yeast bread is here.

    Today’s recipe and method comes courtesy of the River Cottage Bread Handbook by Daniel Stevens. The book goes in to quite a lot of detail about the bread making process- about thirty pages to be exact. Again, when I first got it this was something which I skimmed over so I have now gone back and read it properly.

    It isn’t too different from the Bertinet method from day one of the project, requiring you to stretch rather than knead the dough. The recipe was good in that it works in percentages so once you get the hang if you can play around knowing that it should always work if you stick to the correct ratios. Again not too different from the Bertinet recipe but it gives the basic recipe using 1kg flour and uses dry yeast. It also suggests that you can add a ladle full of starter if you have any (I do, so I did) and also a bit of fat.

    I was interested to see how much kneading would be required with this method. On day one, I worked the dough for up to half an hour so I was looking for something a little easier on the arms (although, great news for bingo wings!).


    Here’s What Actually Happened…

    The Rivercottage Basic Bread Recipe

    1kg flour (I used 70% white, 30% white seeded for a bit of variety)

    10g dried yeast

    20g fine salt

    600ml water

    Ladle of sourdough starter

    Tablespoon of olive oil

    Dough rising

    The method was noticeably easier than on day one- basically stretch and turn, stretch and turn. Repeat. It took me about twenty minutes but I could feel the dough changing in my hands and although I stopped several times to clean my hands, the dough didn’t stick to the worktop anywhere near like it did on day on.

    The first rise took about 90 minutes to double, then I reshaped it and gave it a second rise. This took about an hour to double in size. The book suggests that you can do this three or four times if you wish, but there aren’t enough hours in the day for me.

    After the second rise I shaped the dough into two balls and left the prove for 50 minutes whilst the oven heated. As you can see from the pictures, loaf one isn’t exactly shapely! When I took it off the mat and onto the hot tray it flopped in my hands L So when I put loaf two in I left it on the silicon mat and put the whole lot onto the hot tray and that solved the problem. Oh, I also went and got me a water bottle and sprayed the bread and the oven before the bread went in. Steam = better crust.

    I had to cook them separately but did them both for 10 minutes at 250c and 35 minutes at 170c – these were fan oven temperatures. Both came out well browned and passing the ‘tap test’.

    The Results

    Two loavesLoaf one was wibbly – I need to work on my shaping! As with day one, it was also still a bit claggy inside. It is cooked but still a bit damp. The problem is that the crust is dark and it sounds hollow- so I need to have the courage of my convictions and turn it down for an extra few minutes on low.

    Loaf two looks great. Round, the cuts have opened out and it is cooked through.

    Both are tasty – adding a bit of starter gives some depth to what could otherwise be dull white bread. I am alarmed by how much salt these recipes all seem to call for – is it is necessary for the yeast to work? Saying that, it doesn’t taste salty, and we have little salt in our diets anyway, so I am not going to agonise over it too much!

    I found the River Cottage method much easier, but there isn’t much in them in terms of taste. I am doing white bread on all three days as I think it is a good starting point, but I am already planning the River Cottage sour rye next week!

    cut loaf

    Up Next: Day 3 – Sourdough

    The third and final day of bread week will be Friday 13th (eek) and a sourdough recipe and method from Moro. Actually I will be starting it Thursday night as it is quite a long and slow process. Fingers crossed, the results will be worth it.

    Until then, it is an all you can eat bread buffet in our house- I am doing to absolute opposite of almost everyone in January and overloading on doughy delights!


  • Cracking Bread: Day 1- Fresh Yeast Bread

    This post was written as GoodEggFoodie.com. Please excuse any wonky formatting. Visit the homepage SHE-EATS.com for the latest, shiny new content.

    Three methods, one week. It’s now or never…

    Check out the introduction to the project here.

    So it is day one of baking and first bread I am trying is with fresh yeast.

    I got the book Dough by Richard Bertinet a couple of years ago and although the recipes all specified fresh yeast, I could never get any so substituted dry yeast instead. There was also a DVD which explained the baker’s unique method of working the dough, but I just looked at the pictures in the book instead. It never seemed to work out! So now things are different. I can get fresh yeast easily from the new Morrisons supermarket which is 2 minutes away. I have bought digital scales so I can weigh 10g of fresh yeast instead of weighing out 20g on my old ones and roughly halving it (oh yes, I really did that). I will weigh my water as he suggests (and I have in the past scoffed at). And most importantly of all, I have watched the DVD and taken some notes. You can watch him work the dough here on the Guardian website.

    So what is this magic method? Basically you have to get your hands under the dough, slap it back on the worktop and then stretch and lift. It is much easier to understand after you have watched him do it rather than trying to follow the pictures in the book. Oh, and there is minimal flour on the worktop. The idea is that you get a soft, pliable dough not hardened by additional flour and with lots of air going on inside.

    That’s the theory anyway.

    Here’s What Actually Happened…

    The Bertinet Basic White Bread Recipe

    • 10g fresh yeast
    • 500g strong white flour
    • 10g salt
    • 350g water at room temperature

    In the end I made up three batches of dough – this was not my original plan but I panicked a bit after the first batch.

    Batch 1

    I make up the dough and start working it on the top (which is granite so quite cold). And more, and more…After 30 minutes it is still sticky although it does have some bounce. I have an appointment to go to so I decide to rest it and see what happens. Well nothing much does happen. After an hour it has risen, but only slightly. It takes two hours for it to double in size.
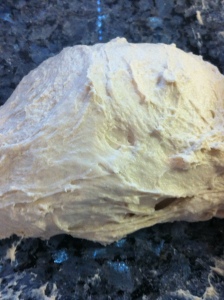
    Dough

    Batch 2

    Over lunch I re-watch the DVD to make sure I am doing it correctly (I am), then decide to give it another go. Again, I work the dough in Bertinet’s way for about 25 minutes. It is coming away from the worktop easier but is still sticking to my hands. Why isn’t it going smooth? The desire to throw flour over everything is strong but I resist. I give it another few minutes, then roll it and leave it to rest. Again, it takes a couple of hours to double in size.

    Whilst it is resting, I do question why I am doing this method with my hands when it obviously isn’t working for me and I have a perfectly good Kitchen Aid with a dough hook. I think that I have it in my head that to use the mixer is cheating somehow and it won’t be made by me. But you know what, if it tastes good, why am I worried? So I decide to put all my self-imposed bread snobbery to one side and do one more batch.

    Batch 3

    Last batch today, I have a life and the kitchen is starting to resemble a flour explosion. Monsieur Bertinet says that if you use a mixer then 6-7 minutes on speed number two. So there you go, he tells you how to do it in the mixer so it must be ok. I mix and shape it and leave it to rise. It doesn’t rise. At all. Bugger. Binned.

    The Results

    Batch one I make in to baguettes following the method in the book. I only get three out of my batch and cook them for 12 minutes. They come out golden brown. They taste good too- chewy like proper baguettes. I am pleasantly surprised as this is the batch which I had no faith in and lead me to making up the two others!
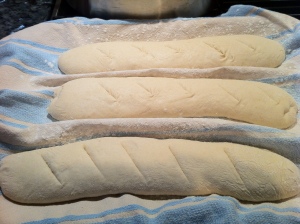

    Shaped baguettes Finished baguettes

    Batch two I shape into a round and make one big loaf which I cook for about 30 minutes until it sounds hollow when I tap it. As you can see from the first picture, I mustn’t have shaped it properly as the ball split as it rose and left me with a loaf shaped like a Muppet’s mouth. Also you can see in the second image, there was lots of air in the top, but it was dense in the bottom. It was still a bit claggy inside so needed longer in the oven- but it was very dark on top and the traditional tap test did suggest that it was done. I’m not sure how else I can test that bread is done? Putting aside that it was slightly undercook, again the taste was good.
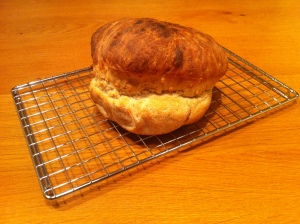
    Muppet mouth bread

    So in the end, the method worked well for the baguettes and the flavour was good. However, It felt alien, slapping the dough around like that, and I never got it silky and smooth like the author said should happen. In the book it says you can knead using this method in 5 minutes when you get the hang of it. I just can’t see how that would be. So for me it is a case of good flavour but not a technique which I am comfortable with.

    Up Next: Day 2- Dry Yeast

    Cracking Bread day 2 will take place on Wednesday 11th (we need a day to eat the baguettes before cooking any more!). I will be making a loaf using recipe and method from the River Cottage Bread Handbook. Day 3 will be Friday 13th and sourdough from Moro.

    If you have any tips or your own experiences of real bread, I would love to hear them.

    Until Wednesday, happy baking to you all!